Our good friends came into town this past weekend. I was so excited because Ashton loves crafty things. It is hard to find people that really want to take on ambitious projects like myself. I often bite off more than I can chew. But I'd rather have a bunch of bitten off projects than none...lol. Anyways, she was so helpful. She is great with Lucy and just so sweet to be around. She helped and so did her husband, my husband's favorite person in the whole world, Brennan. Brennan just happens to be pretty experienced in carpentry...Oh I love how things just work together and go my way sometimes.. :)
How about I lay it out in steps...
STEP 1: INSPIRATION
I looked everywhere for pallet headboards and all sorts of different types of wood headboards. I definitely wanted wood. Nothing held a candle to this beauty:
This is a great blog all together. This look is definitely what I was envisioning..Rustic yet elegant. Slightly coastal but just plain ole rustic! I love it. PLEASE check out her blog. She has great tutorials and ideas for DIY.
STEP 2: GET PALLETS
Every weekend there is at least one post about free pallets on craigslist. I got lucky and found a guy in my neighborhood that was flipping a house and home depot delivered a bunch of stuff on pallets to his house. So we picked them up, wagon style.


Das Right...
It was a lot of fun..Good thing it was just in our neighborhood.
STEP 3: DISMANTLE PALLETS
This is extremely hard to do without power tools. I love my neighbor. She has everything. So I borrowed her sawsall and Ben cut the nails from the boards..


Yep he's pretty hott.
We pulled them out from the middle. You can shimmy the wood and twist it and the nails pull out. It's hard to get the saw down in the middle brace.
Then I hammered out any remaining nails from the bottom.


Then I threw them very bad-A like into a pile
STEP 4: PlAN OF ASSEMBLY
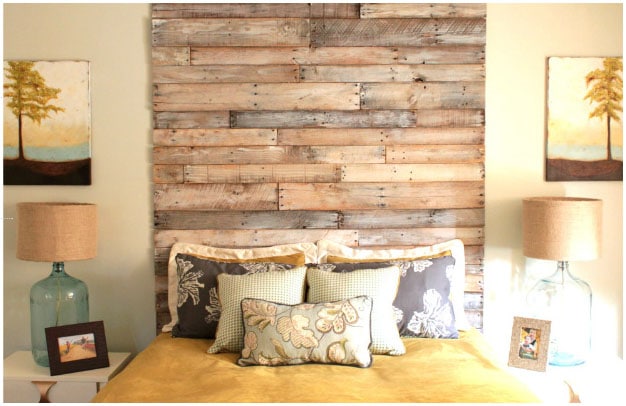
I read a bunch of different tutorials of how to actually build the headboard. The Rooster and the Hen just nailed them right into the wall...We don't actually own our house and would love to one day take our beautiful headboard with us and also do not want to put a ton of holes in the wall. Also, I didn't really need the headboard to be floor to ceiling. So my brilliant husband had the idea of just nailing them to a piece of plywood and then hanging the plywood on the wall..DING DING DING. And it worked perfectly. Plus, a piece of standard plywood is about the size I needed. I wanted it to be 4' high and 7 feet wide. Plywood is 4' x 8'. So, we had our plan.
STEP 5: GATHER MATERIALS
We made a trip to home depot and purchased our plywood for $15. They cut it to size there. We also bought a pack of screws 1 1/4 " long. Long enough to go through the pallet wood and plywood but not completely through the plywood. The nails did stick out just a little bit. You may be able to get away with getting 1" screws...but either way works.
STEP 6: MATCH 'EM UP
Pallets by width....This is the meticulous part. There is always a meticulous part of DIY. This is it. Even if the wood boards came from the same pallet, because of water, weight, the sun, whatever, they could all be slightly different in size. Ashton and I had to match up by width so you could have an even row. Because it would add lots more meticulous if you didn't have an even row...
Pallets by width....This is the meticulous part. There is always a meticulous part of DIY. This is it. Even if the wood boards came from the same pallet, because of water, weight, the sun, whatever, they could all be slightly different in size. Ashton and I had to match up by width so you could have an even row. Because it would add lots more meticulous if you didn't have an even row...

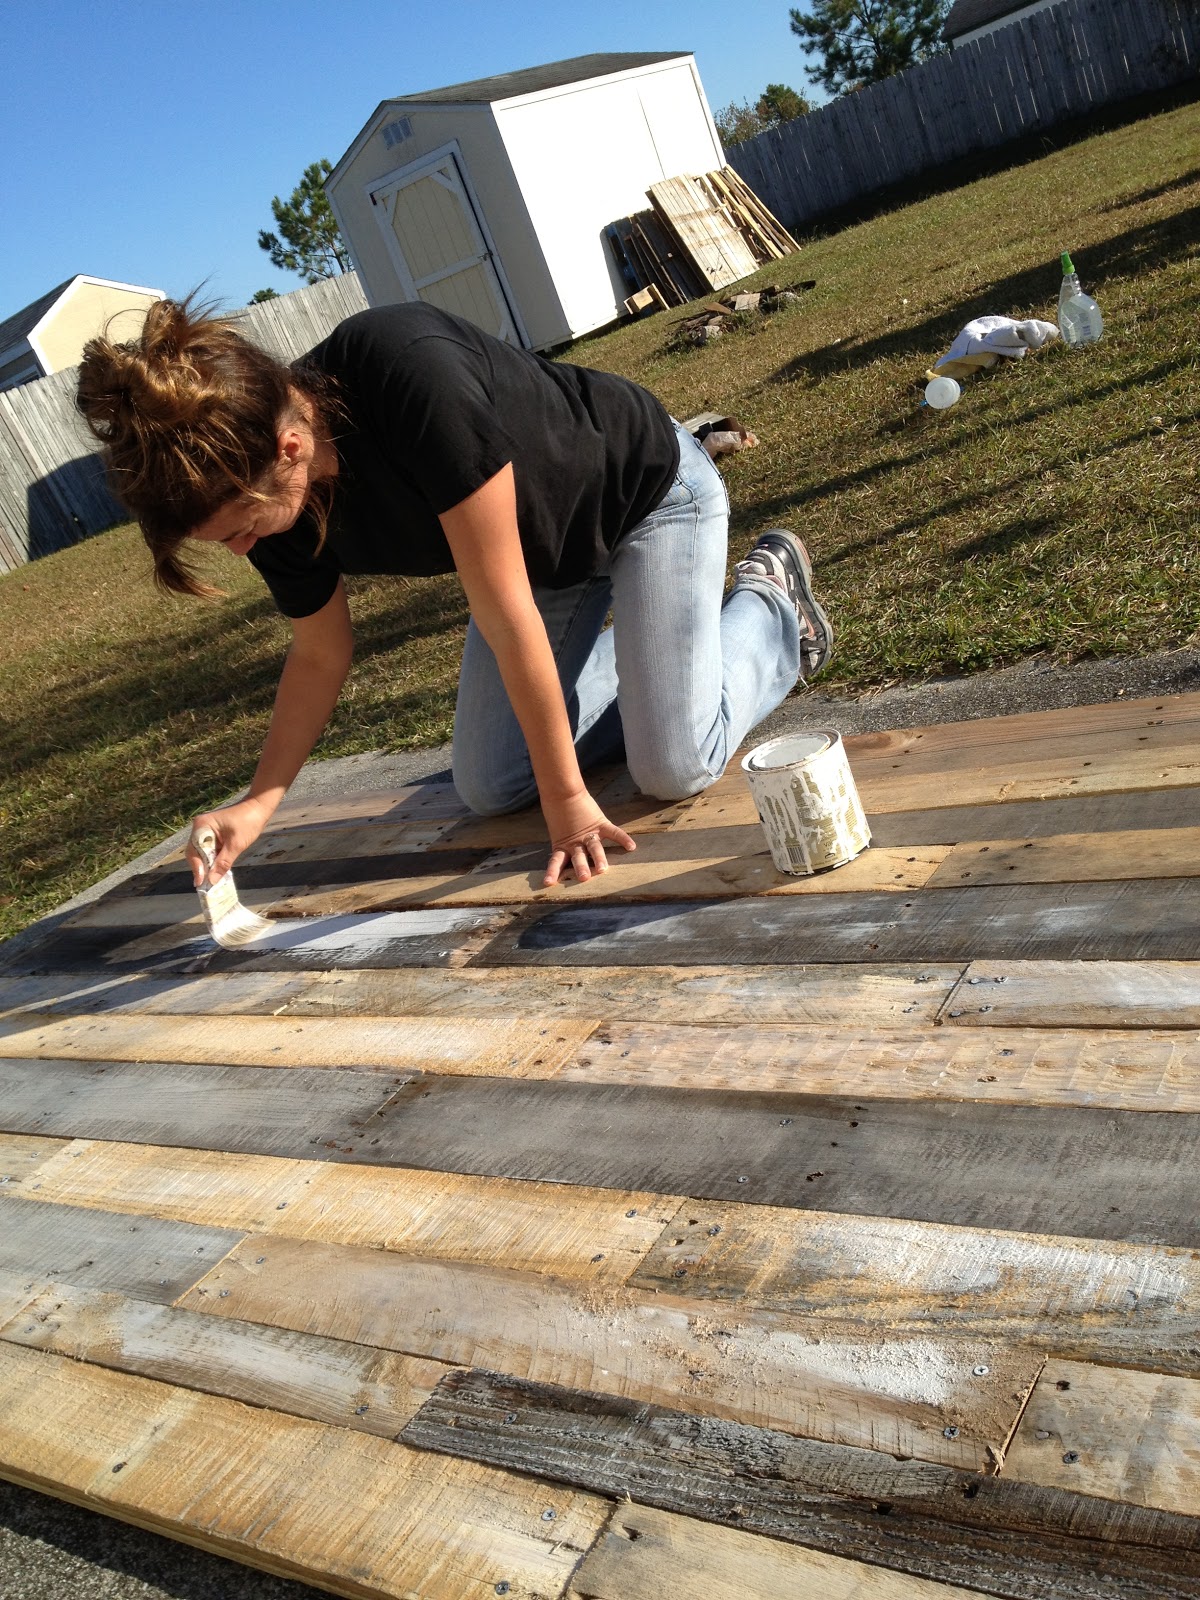
AFter we finally matched them, we trimmed the edges to make them fit and to give it a scattered look.

Then we nailed them to the plywood...well Brennan mostly...

Then we heard the icecream truck and Ben took Lucy for her first treat from the truck...It was sweet.

Then I gave it a white wash.
And then we oooo-ed and ahhhhh-ed over it for a while.

Then nailed it into the studs over our bed. Only put about 12 wholes in the wall. Much better than 100. I'm thankful to rooster and the hen for their inspiration! I love ideas. I love sharing my ideas so that others can use them to make their lives more fun and full. This project was so much fun, especially to do it with good friends. Now my room feels much more like a bedroom and my next project will be lampshades...Post to come. Hopefully it won't take long!

No comments:
Post a Comment